Adding multi-state objects to your Adobe Digital Publishing Suite app creates a fun and engaging experience for your readers. We recently posted a tip that explained how to create simple multi-state objects for DPS apps. In this tip, we’ll review how to edit them.
Editing multi-state objects can be a bit tricky, so we recommend that you create a layer in your InDesign layout just for multi-state objects. This will make selecting them much easier.
From the layout, select a multi-state object. This will open the Object States panel, which is also found under the Window>Interactive>Object States menu. In the Object States panel, do any of the following:
- Make simple edits to a state (i.e., add a stroke or fill, or resize the object) after selecting the state in the Object States panel.

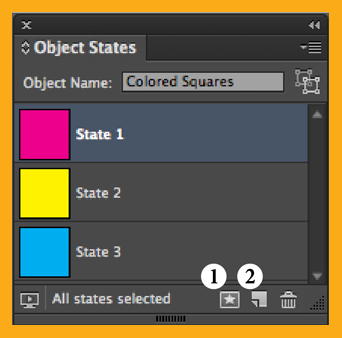
- Add an object to an existing state by selecting both the object you want to add and the multi-state object you want to add to. This will change the button seen in the screenshot (#1). Click the Add Objects To Visible State button.

- Select both an object and the multi-state object, and then click the Convert Selection To Multi-State Object button (#2 in the screenshot) to add the object to an existing multi-state object.
- Duplicate a state by selecting a state to base the new state on, then select New State from the panel menu. Edits can be made to the content of the new state.
- With a state selected in the Object States panel, select Paste Into State from the Object States panel menu, or click the Paste Into State button (#1 in the screenshot) to paste objects that have been cut or copied into an existing state.
- Convert a multi-state object(s) back to independent object(s) by choosing the state in the Object States panel and then selecting Release State To Object from the panel menu. Convert all states in the multi-state object to objects by selecting Release All States To Objects.
- Select Delete State from the panel menu to delete a selected state and remove its contents.
- Select Hide Until Triggered from the panel menu to hide the multi-state object in the exported file until it’s triggered by a button.
- A multi-state object will remain in the last state selected, even if you close and reopen the document. If you want the first state to be active for all of the multi-state objects in a document, select Reset All Multi-State Objects To First State from the panel menu.
Check out TFP’s DPSCreate™ Handbook or DPS Create™ App for more details about building interactive iPad apps.
For other great tips, sign up for the TFP newsletter. Want to learn even more and become an expert? Check out all our best-selling products at www.tech4pub.com/products, including our DPSPublish™ app at www.tech4pub.com/product/dpspublish-app/.
Note: Information contained in this post is current as of DPS v30. Visit the Technology for Publishing blog at www.tech4pub.com/tag/dps-version-update/ for the latest info on Adobe software releases and functionality.
Posted by: Monica Murphy


