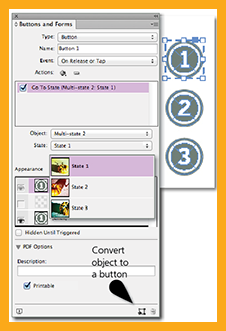
In previous tip posts, we discussed creating and editing multi-state objects, which are great additions to an Adobe Digital Publishing Suite app. Creating navigation buttons that trigger the Go To Next State and Go To Previous State actions is another level of interactivity that is fun for users. In this post, we explain the steps to create numbered buttons to navigate through a slideshow in a DPS app.
Create Slideshow Navigation Buttons
- In your InDesign document, create a set of buttons that will be used to navigate through the slideshow. The buttons can be designed so that each one matches up with an object state, or they can be designed as forward/back or next/previous buttons.
- Select Window>Interactive>Buttons and Forms.
- Select the first button. At the bottom right of the Buttons and Forms panel, select the Convert Object to a Button icon. Enter a name for the button in the Name field.
 Leave the Event selection as On Release or Tap.
- Next to Actions, click on the plus-sign icon to add a new action to the selected button.
- Choose one of the following:Go To State should be used when each button is designed to activate a state of the object. After selecting Go To State from the actions menu, select the name of the multi-state object from the Object drop-down menu. Then, in the State drop-down menu, select the state of the object to be activated by the button.Go To Next and Go To Previous should be used when buttons are designed for forward/back navigation, such as arrows.
- In the Appearance pane, a small thumbnail of the button will appear; it will be labeled Normal.
- Set the appearance of the button to change after it is tapped by selecting Click in the Appearance pane. Open the Swatches panel and select different fill/stroke colors. (Note: The Rollover state in the Appearance pane is not supported in the DPS tools.)
- Select the remaining buttons, one at a time, and repeat Steps 7-12 for each button.
Building multi-state objects and adding navigational buttons can seem daunting at first, but try it a few times, experiment with different settings, and remember that these interactive objects can be copied, pasted, modified, and used again elsewhere in your apps!
Check out TFP’s DPSCreate™ Handbook or DPS Create™ App for more details about building interactive iPad apps.
For other great tips, sign up for the TFP newsletter. Want to learn even more and become an expert? Check out all our best-selling products at www.tech4pub.com/products, including our DPSPublish™ app at www.tech4pub.com/product/dpspublish-app/.
Note: Information contained in this post is current as of DPS v30. Visit the Technology for Publishing blog at www.tech4pub.com/tag/dps-version-update/ for the latest info on Adobe software releases and functionality.
Posted by: Monica Murphy


