You know how a workspace can become so familiar that you forget what’s hidden in all the nooks and crannies? InDesign is sort of like that for me. Recently, I was working on a complex project that was more than 40 pages long. I needed to be able to quickly navigate back and forth between pages and get an instant update on what my changes were doing to the overall page count. So I was very pleased with myself when I re-explored the Pages panel and found new ways to work. Here are some helpful tips:
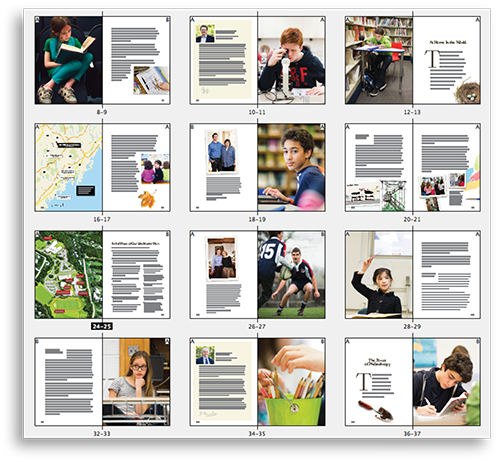
1. View your pages as thumbnails. If you’re not doing this already, you’re working in the dark—especially if you work on long documents. Use the drop-down menu at the upper right corner of the panel and select Panel Options. Check the Show Thumbnails box and set your page size to Jumbo.
2. View your pages horizontally. Using the same drop-down menu, select View Pages>Horizontally. Pull the panel window edge to widen it (hover your cursor over the edge, click, and pull left or right). Voila! You can now see a mini-map of your pages. I love using this bird’s-eye view to instantly see how layout changes affect text flow through the entire document. When you want to make the panel narrower, just hover over the edge again and pull left or right. You’ll snap back to a vertical spread view. Best of both worlds!
3. If you’re not already using the automatic page numbering feature, slap yourself and read my Jan 8 blog post. I’m always shocked when I pick up another designer’s document and find that the designer has been changing folio numbers by hand. Every time a layout grows, shrinks, or shuffles. If you learn nothing else in the next 10 minutes, learn this. You’re welcome.
4. Now that you’re picking up super-user speed and prowess, you’ve probably got some layouts in your document that you want to duplicate. There are lots of ways to do this in InDesign. And then there’s the smart way. From the Pages panel, shift-click to highlight the pages you want to dupe. Hold down the option key and drag the pages to the left or right, into the blank area of your Pages panel. You’ll see a vertical placement bar to show you where the pages will be inserted. Voila! You’ve now got exact duplicates of your content. If you don’t see a placement bar, you may not have enough empty space in your panel. Widen your panel and try again.
5. You can move pages within your document the same way: Shift-click to select the pages you want, and then drag them to their new location. In larger documents, dragging pages can be tedious. With pages selected, go to the drop-down menu and select Move Pages. You’ll be able to select precise locations, including “End of document” or “before or after” specific pages. You can also choose to move the pages to another open InDesign document.
Bonus tip: At the upper left corner, next to the Pages panel label, is an up/down symbol. Click that symbol (or anywhere in that bar to the left or right) once to minimize your panel to a smaller box. Click it twice to minimize to just the panel name bar (remember the window-shade effect?). Love this option to quickly hide and show my oversized panels while I’m working!
Also, check out my blog on maximizing your InDesign workspace.
For other great tips, sign up for the TFP newsletter. Want to learn even more and become an expert? Check out our best-selling products at www.tech4pub.com/products.
Posted by: Mary Lester


