Using hyperlinks in your Adobe Digital Publishing Solution apps gives readers additional ways to navigate to destinations inside and outside of an app. With hyperlinks, they can navigate to specific articles or collections, and use custom “back” and “parent” buttons or buttons that navigate to the launch page of the app. Readers can also use relative “navto” commands to jump to the next, previous, first, or last article within a collection.
Examples of new linking capabilities include:
- navto://collection/[collectionname] jumps from an article to a collection
- navto://relative/parent jumps to the parent view of the current article
- goto://FolioNavigation/lastview behaves like the Back button in the navigation toolbar
- navto://collection/[collectionname]/article/[articlename] jumps to an article within the context of a different collection
These hyperlinks can be created in InDesign using the Hyperlinks panel or the Buttons and Forms panel. Note: Hyperlink overlays are supported in scrollable frames and slideshows, but not in other overlays.
Create a Text Link Using the Hyperlinks Panel
- Select the text to use as a hyperlink.
- Select Window>Interactive>Hyperlinks to open the Hyperlinks panel.
- Select the Create New Hyperlink icon at the bottom of the panel, and select New Hyperlink from the panel menu, or right-click and choose Hyperlinks>New Hyperlink or New Hyperlink From URL from the contextual menu.
- In the New Hyperlink dialog box, deselect the Shared Hyperlink Destination checkbox and select the desired type of link from the Link To menu. The links that are supported are URL, Email, and Page. Leave the remaining options at the default settings.
- Click OK.
Create Hyperlinks Using the Buttons and Forms Panel
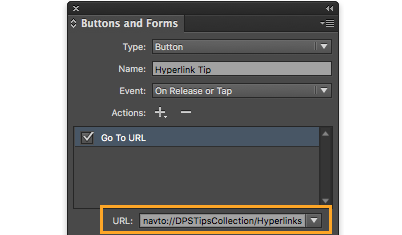
Use the Buttons and Forms panel to create hyperlinks and apply them to an object frame or group of object frames.
- Create an object that will serve as a button.
- Select Window>Interactive>Buttons and Forms to open the panel.
- Select the object and click on the Convert Object to a Button icon at the bottom right of the panel.
- Enter a name for the button in the Name field.
- Leave the Event selection as On Release or Tap. Next to Actions, click the plus-sign icon to add a new action to the selected button. Multiple button actions can be selected and are played in sequence. Actions supported include Go To First Page, Go To Last Page, Go To Next/Previous Page, Go To URL (use for navto:// hyperlinks), Sound/Video, Go to State, Go to Next State, and Go to Previous State.
- Close the Buttons panel.
- With the button graphic selected, select Window>Overlays.
- For the button to launch an in-app browser that allows the reader to stay within the publication app, select Open in App. Or for the link to launch the device’s browser and close the publication app, choose Open in Device Browser.
- To ask the reader if launching the device’s browser is OK, check the Ask First box.
- Close the Overlays panel.
Note: Buttons can be copied and pasted to alternate device layouts and all of the options originally selected will be retained.
For the most current information about formatting hyperlinks, see Adobe’s Hyperlinks page.
For weekly tips and updates on Digital Publishing Suite, Digital Publishing Solution, and InDesign, check out our blog and sign up for our newsletters. Want to learn even more and become an InDesign or DPS expert? Check out all our best-selling handbooks and apps.
Note: Information contained in this post is current at the time of posting. Visit the Technology for Publishing News & Events blog for the latest info on Adobe software releases and functionality.
Posted by: Monica Murphy


